An Idea Mapping Success Blogs Weblog
Idea Map #110 – Mindjet Connect Review From a Beginner’s Mindset
17Jun2008 Filed under: Idea Mapping Example, Mind Mapping Examples, Mind Mapping Software Author: Jamie Nast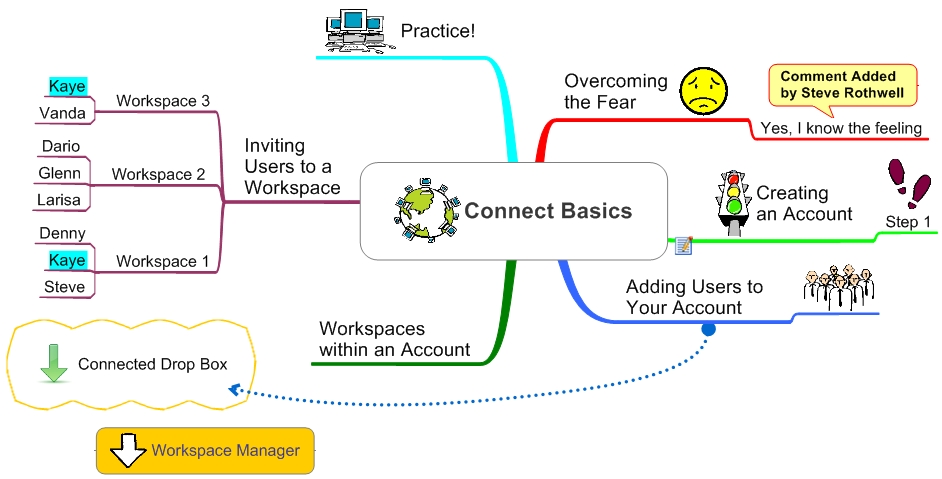
Learning new technologies and/or software products has historically been a bit intimidating for me. I’ve had an iPod Nano for several months and still can’t figure out how to move a podcast from iTunes onto my iPod. Pathetic! So it is from the perspective of a beginner’s mindset that I would like to share my personal learning journey to date with Connect.
First let me say that I did not look at the video tutorials or any of the other helpful resources that Mindjet provided to save me any pain. I guess the time pressure caused me to see if I could avoid this necessary step. Not one of my smarter decisions. Rather than confuse you with how I went about things backwards, I’ll share some simple thoughts I’ve learned on this journey so far. The attached map is an outline of some of my comments created in Connect.
1:00 Branch – OK, enough about my hesitation! Let’s learn this fabulous tool!
3:00 Branch – Everything starts by creating a Connect Account. There are probably a couple of scenarios where you could argue for having more than one account, but most people will never need more than one. Start simple.
5:00 Branch – The next step is to add users to your account. In the lower left hand corner of the screen, left click on the Connected drop down and select Add Users. This will open a browser that will let you add users to your account. This is where you will add all of the people with whom you ever want to share information. Now they have been added to you account and will be part of a menu of people that you can invite to participate in any number of work spaces.
I got messed up because I didn’t understand the difference between an account and a workspace (thanks Steve DiLauro for the clarification). My account is called Idea Mapping, and I am the administrator. I invited a variety of people to be part of my account; but nothing goes further until I create a workspace.
You can own an account or be invited to participate in someone else’s workspace. In this latter case you are not the owner of the account. That’s where it takes a little time to get used to. All of the accounts you own or are part of show up in your account list. You can tell which one you own because the word “Administrator” will follow your account name. Select your account and then left click on the Workspace Manager box to the right of the Connect box.
7:00 Branch – Inside the Workspace Manager select New Workspace in the top left box. From the Documents box, select a new document (the default is a map) or import a document you want to share or create with others.
9:00 Branch – Now it’s time to invite members of your account to share in this workspace. The people you invite to your workspaces will vary based on your purpose. Go to the Workspaces box and select Add Members. Choose from the list of people you have invited to your account.
So there are two invites. First is inviting people to your account, and second is inviting them to various workspaces. Notice that Kaye is in two of my three workspaces.
11:00 Branch – All that is left now, is for you to practice connecting! I built this map in Connect and invited several others to the workspace. You can see Steve Rothwell’s comment on the 1:00 branch.
Since the creation of this map, I’ve had two “Instant Meetings” using Connect. It was simple, easy, and a great way to share information.
This tool is like no other and has the potential to continue to revolutionize how we work and think and learn! This map is features in today’s monthly Mindjet Newsletter.
![[Ask]](http://ideamapping.ideamappingsuccess.com/IdeaMappingBlogs/wp-content/plugins/bookmarkify/ask.png)
![[del.icio.us]](http://ideamapping.ideamappingsuccess.com/IdeaMappingBlogs/wp-content/plugins/bookmarkify/delicious.png)
![[Digg]](http://ideamapping.ideamappingsuccess.com/IdeaMappingBlogs/wp-content/plugins/bookmarkify/digg.png)
![[Facebook]](http://ideamapping.ideamappingsuccess.com/IdeaMappingBlogs/wp-content/plugins/bookmarkify/facebook.png)
![[Google]](http://ideamapping.ideamappingsuccess.com/IdeaMappingBlogs/wp-content/plugins/bookmarkify/google.png)
![[MySpace]](http://ideamapping.ideamappingsuccess.com/IdeaMappingBlogs/wp-content/plugins/bookmarkify/myspace.png)
![[Slashdot]](http://ideamapping.ideamappingsuccess.com/IdeaMappingBlogs/wp-content/plugins/bookmarkify/slashdot.png)
![[Sphinn]](http://ideamapping.ideamappingsuccess.com/IdeaMappingBlogs/wp-content/plugins/bookmarkify/sphinn.png)
![[StumbleUpon]](http://ideamapping.ideamappingsuccess.com/IdeaMappingBlogs/wp-content/plugins/bookmarkify/stumbleupon.png)
![[Technorati]](http://ideamapping.ideamappingsuccess.com/IdeaMappingBlogs/wp-content/plugins/bookmarkify/technorati.png)
![[ThisNext]](http://ideamapping.ideamappingsuccess.com/IdeaMappingBlogs/wp-content/plugins/bookmarkify/thisnext.png)
![[Twitter]](http://ideamapping.ideamappingsuccess.com/IdeaMappingBlogs/wp-content/plugins/bookmarkify/twitter.png)
![[Webride]](http://ideamapping.ideamappingsuccess.com/IdeaMappingBlogs/wp-content/plugins/bookmarkify/webride.png)
![[Email]](http://ideamapping.ideamappingsuccess.com/IdeaMappingBlogs/wp-content/plugins/bookmarkify/email.png)
Idea Mapping Blog
The purpose of this blog is to share idea mapping examples and related learning from my Idea Mapping, Memory, Speed Reading, and Certification Workshops. This blog is dedicated to my Certified Idea Mapping Instructors, my clients, Mind Mapping and Idea Mapping practitioners around the globe.
Jamie Recommends:
Leave a reply